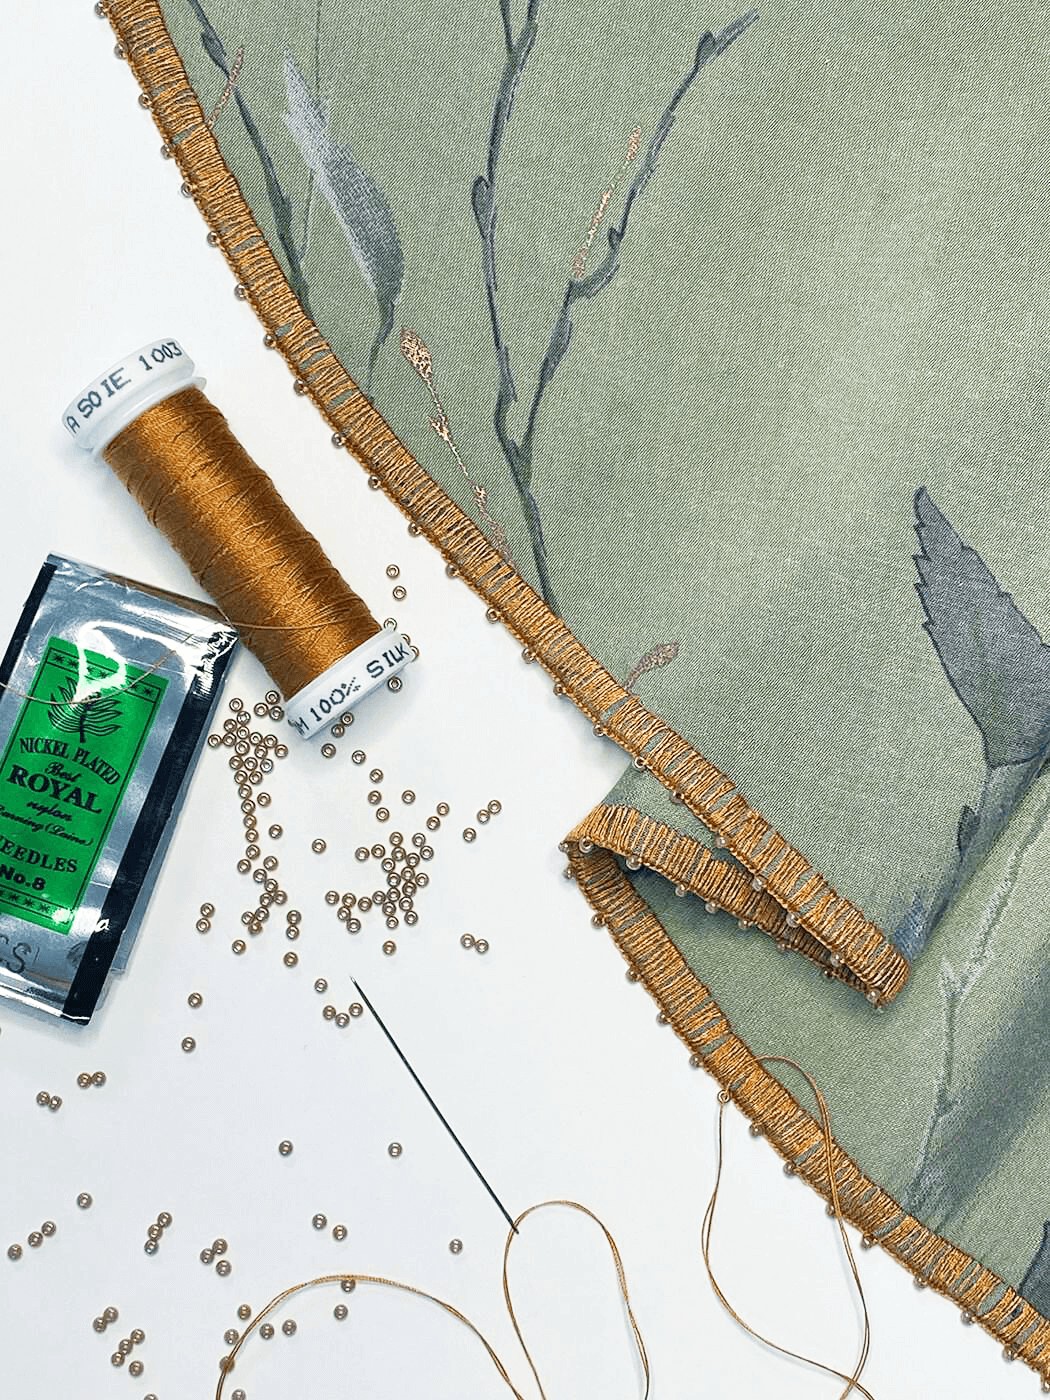

In retirement, with more time and energy to focus on my making, I’ve moved into slow-sew mode. On this blouse I recently made for myself I really enjoyed taking my time to make it special with a beaded picot edge finish on the sleeve hems.
What is picot edging?
Picot edge finishes were de rigueur in the 1920s and 30s, the fashion time period that is the inspiration for my new blouse. Though there were picot machines available at the time doing this type of hem finish commercially, I’m writing about one of the picot techniques worked by hand to finish the hem edges of delicate fabrics.
A picot stitch is basically a buttonhole stitch with regular and uniform interruption to add interest to a hem finish. There are many variations on hand picot techniques. I first considered the Loop Picot, which is a typical finish seen on ribbon or lingerie. The Venetian Picot, and Bullion Picot stitches are pretty and a little more intricate. But I decided the Beaded Picot stitch had a vintage quality I couldn’t resist.
The Supplies
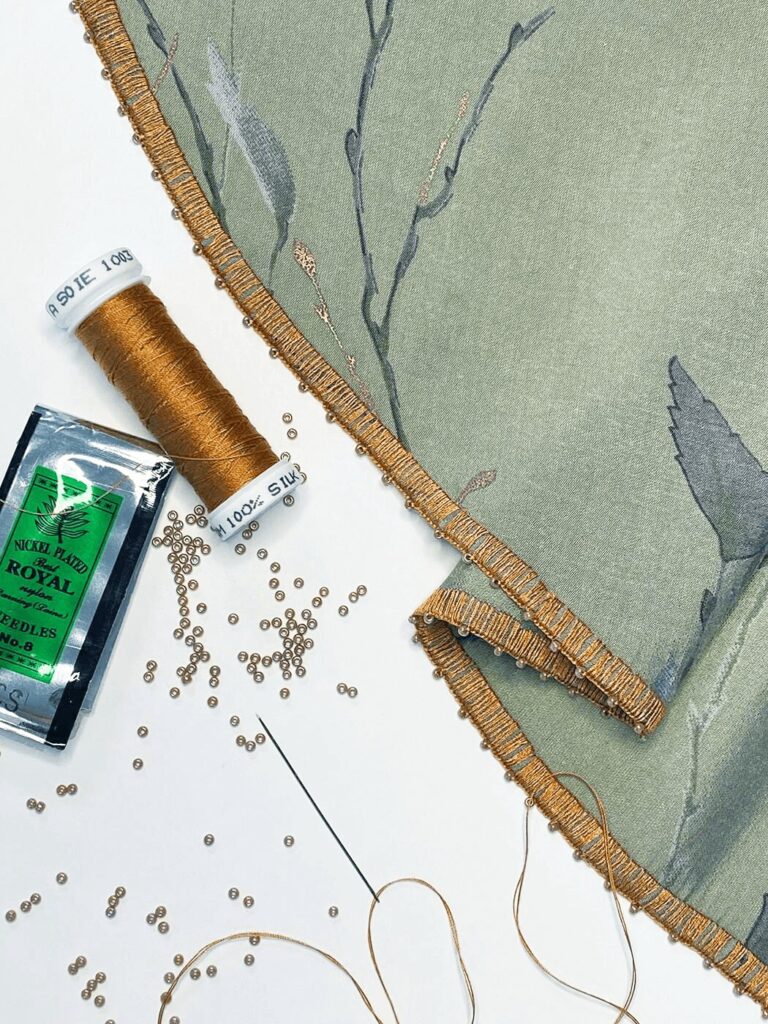
On this project I was determined to work with the stashed fabric, thread and bead supplies I had on hand. In the end, I did need to purchase an additional spool in order to finish off the second sleeve.
The thread – Au Ver A Soie 100/3 silk embroidery thread, color #323. The 100/3 thread is a single ply twisted spun silk with a nice luster.
The needle – Most embroidery instructions advise using a short needle, but I’m more comfortable and adept with a longer needle. I purchased these Japanese-made Best Royal #8 darning needles in Spain several years ago, and they are my go-to needle to use for just about any hand sewing. Super sharp, Royal #8s have a nice long eye for easy threading, but are still slim enough to pass through a seed bead.
Seed beads from my bead stash – Glass beads will stand up to pressing with a hot iron. I bought these sage green beads back in 1985 for beading on a flower girl dress I made for my daughter. Yes my fellow Makelings, I save everything. You never know when it will come in handy.


My technique
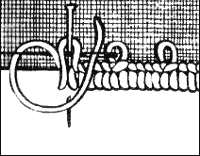
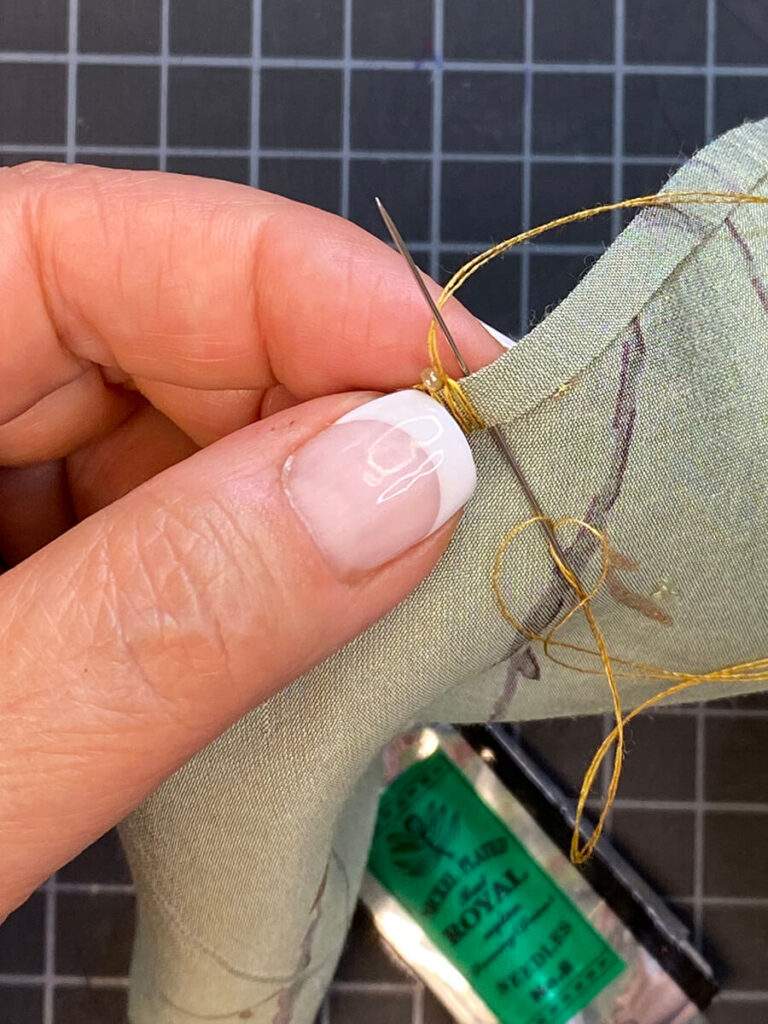
- Start by pressing in a double fold narrow hem. Fold the fabric towards the right side of the work.
- Thread a needle with a doubled length of silk thread and knot the end.
- Hold the work right side up, with the fold of the hem visible. Anchor the thread with a tiny knot, buried within the hem allowance.
- Insert the needle point just beneath the fold of the hem. Poke the needle to extend straight up above the edge of the hem.
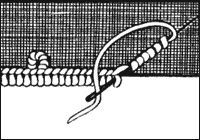
- Loop the thread under the needle point. Pull the needle perpendicular to the fabric edge, thread taut. Use a fingernail to position and tighten the purl produced at the top edge of the hem. These continued purls will form the lovely “braid” along the edge of the fabric.
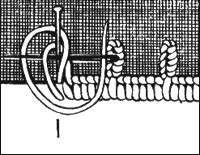
- Once in position, thread one bead onto the needle. Push it down tight to the hem edge. Keep the bead tight to the edge and sew the next buttonhole stitch. Push the purl up tight against the bead. Continue to buttonhole stitch up to the next bead position.
- For further insight on sewing this stitch, refer to the video at the end of this post.
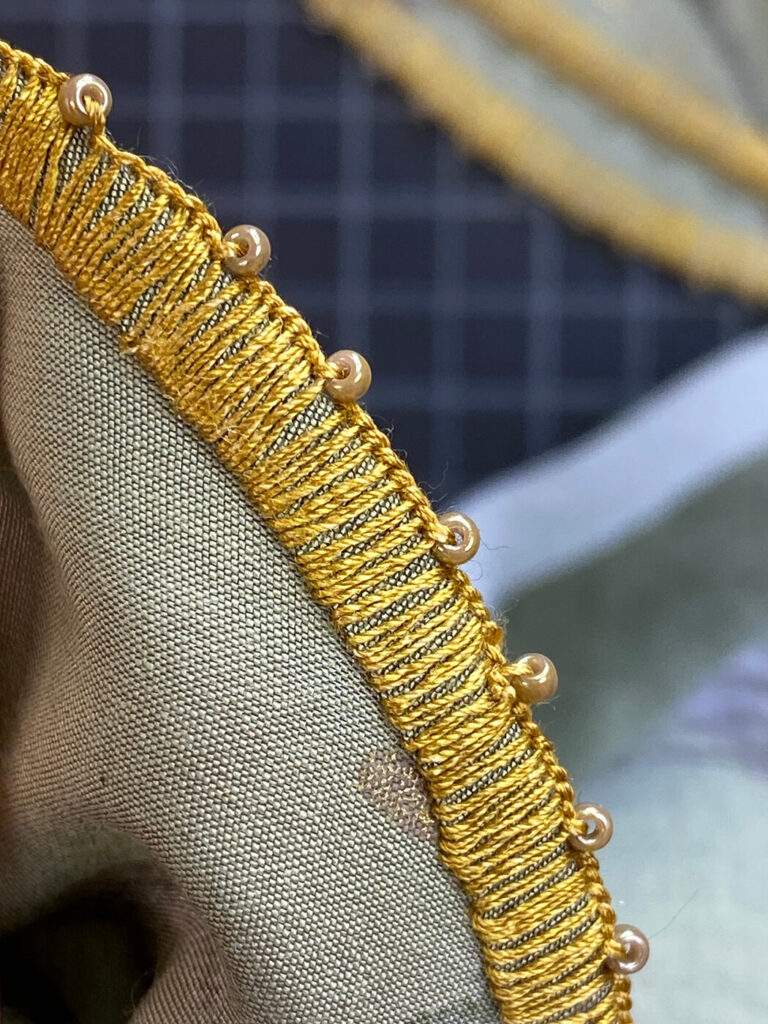
I stitched eight, very close-set buttonhole stitches between each seed bead. Of course, the ratio and number of beads used is all variable depending on the finished product you’re aiming for. To figure this out, I tried several combinations on a scrap before landing on the right look.
Time consuming? Yes, but very satisfying.
I worked on this hand embroidery in the evenings, usually with something familiar on the tube for company. Once I had my rhythm down, I was able to sew 6-8 inches of picot in couple hours.
Though I love my high-tech sewing machines, I derive such pleasure working with a sharp needle, thread and my own two hands. This picot edge finish turned out exactly as I’d imagined, which is very satisfying.
Now that I’ve delved into this fine embellishment technique, I plan to expand my repertoire. I am happily researching other by-hand techniques to try, so I can, you know, make it special 🙂


 How to Make a Vyshyvanka Blouse — Ukrainian Embroidery Techniques
 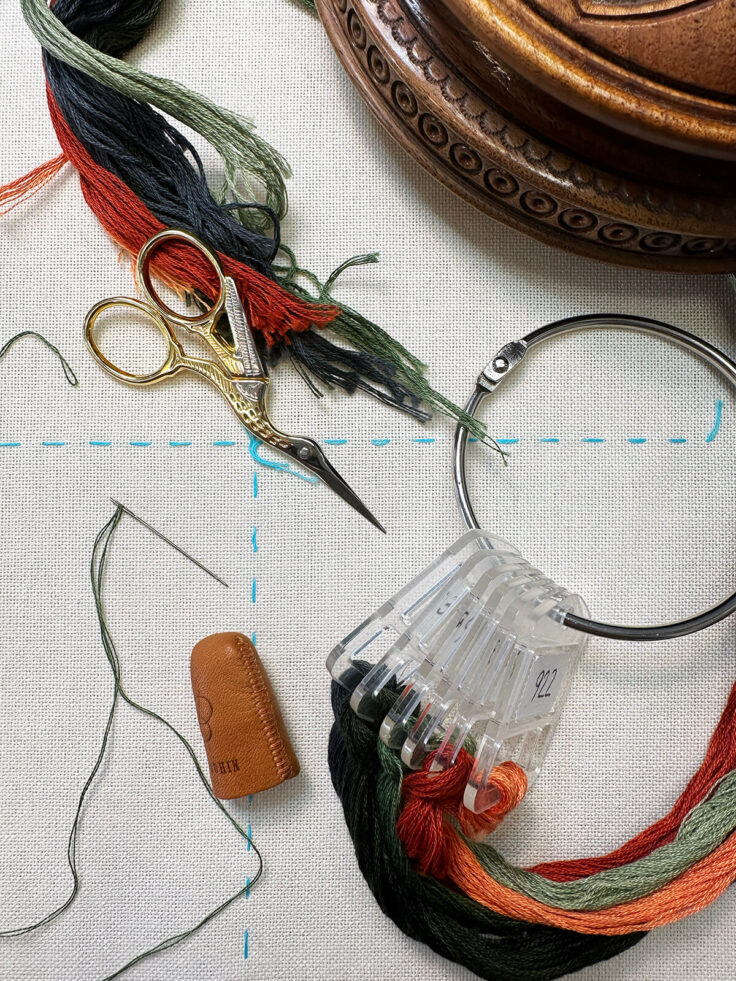 How to Make a Vyshyvanka Blouse – Ukrainian Embroidery Prep
 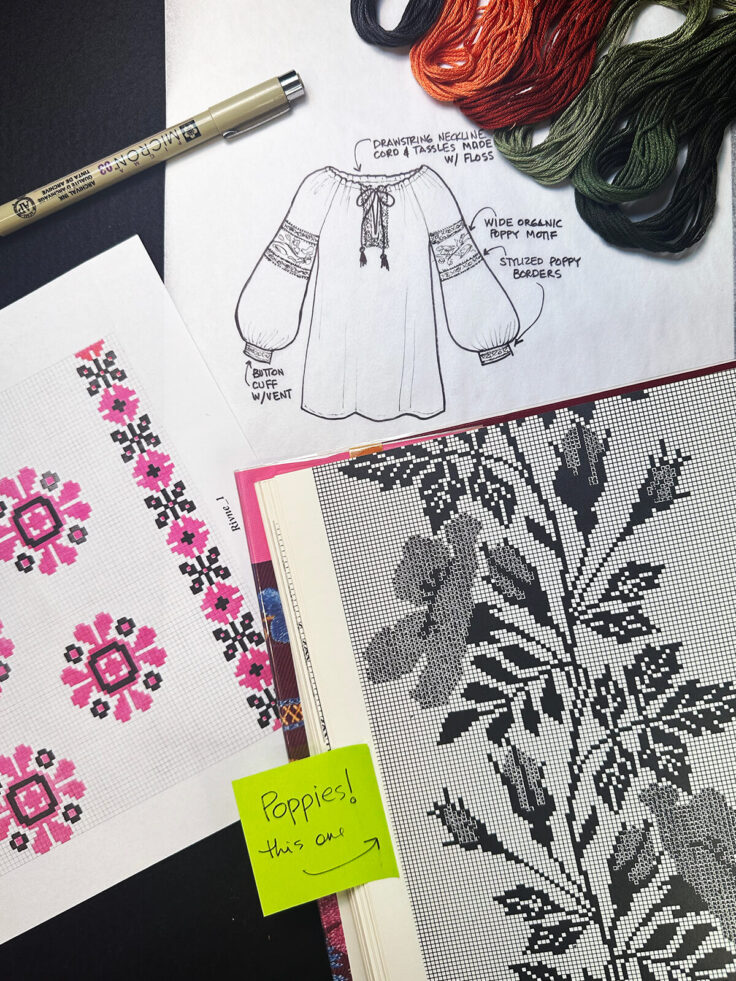 How to Make a Ukrainian Vyshyvanka Blouse – The Planning
Leave a Reply