Makelings latest project:
Using Ukrainian embroidery patterns and techniques, I am making a vyshyvanka blouse for my eldest granddaughter, Gloria. This is the second installment of a four part series documenting my process for making this blouse.
As I find with most sewing projects, the actions and decisions at the preparation stage are crucial to a successful outcome. I haven’t worked on any Ukrainian embroidery in years, so I need to take some time to make sure I have the correct tools and materials required. Here, I will detail the rationale behind my material selections, and the processes for preparing so I can move on to the fun part – the actual embroidery.
Embroidery Technique and Method
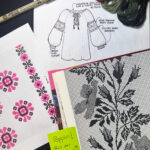
As mentioned in my initial post, How to Make a Ukrainian Vyshyvnka Blouse – The Planning, there are many different Ukrainian embroidery techniques to choose from. It’s been at least 25 years since I made a vyshyvanka blouse, so I’m sticking with the tried and true method — the khrestyk (counted cross stitch). There are two ways to go when choosing a fabric for a vyshyvanka using khrestyk. I’ve use both of these methods in the past:
Ukrainian Embroidery Fabric Option #1: Traditional
Choose a evenweave fabric and embroider directly onto the fabric. Evenweave is a fabric that is uniform warp and weft thread count per inch. Ukrainians have embroidered on linen evenweave for millennia.
Upsides – Ukrainian embroidery on evenweave looks very neat and precise. Evenweave fabric has lasting, heirloom quality, and is durable and washable.
Downsides – A quality evenweave is pricey. I found that the two yard length required for a vyshyvanka is not available at a store and needs to be special ordered in an already tight schedule. The color and weight options for evenweave fabric are limited. Evenweave is not as flowing and drapey as other weaves of fabric.
Ukrainian Embroidery Fabric Option #2: Modern
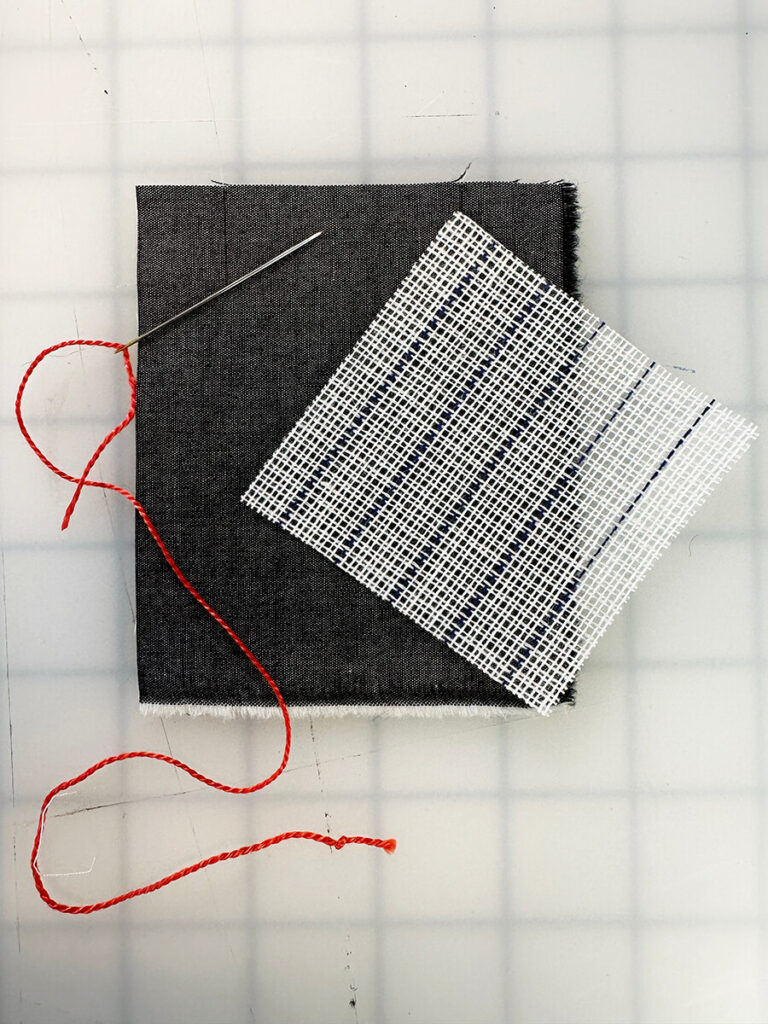
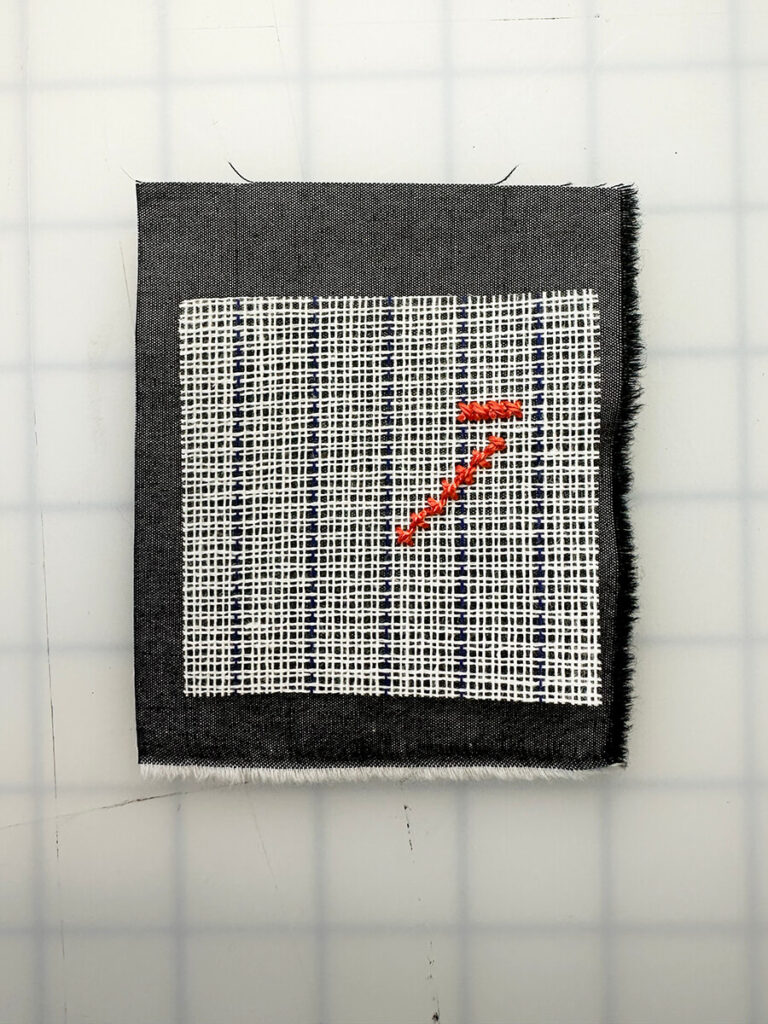
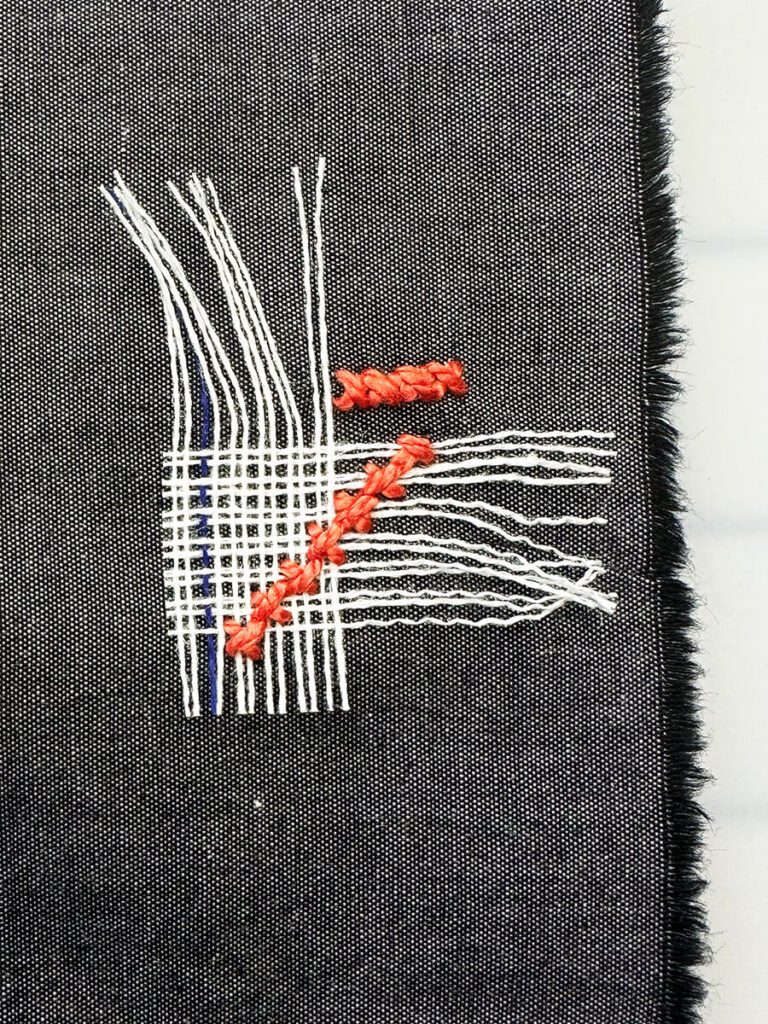
Choose a woven fashion fabric and use waste canvas to accomplish the embroidery. Waste canvas is a starchy stiff material that is temporarily basted onto any fabric and used as a guide for the counted cross stitch. Once stitched, the waste canvas is soaked to remove the starch. When dry, the waste canvas is tediously pulled out, thread-by-thread, leaving the evenly sewn cross stitches in place.
Upsides – Using waste canvas really opens up my color and weave options. I could choose a fabric with a flowy drape. Maybe even use a something lovely from my fabric stash.
Downsides – I find waste canvas to be very laborious both pre and post embroidery. Positioning and basting down the waste canvas takes a lot of time. Removing the waste canvas is an especially tedious time suck. A water-soluble version of waste canvas available. Though intrigueing, I’ve never used it before and I don’t have the time on this project for experimentation.
Tradition and Precision Wins Out
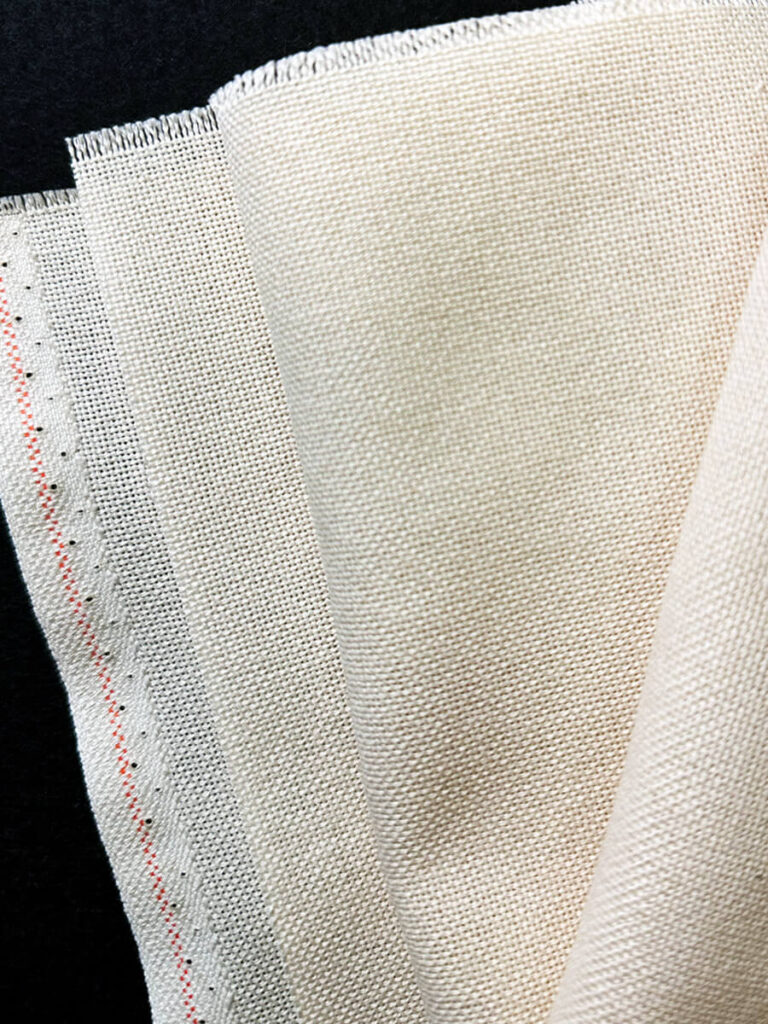
I am very lucky to have a very nice embroidery shop in my town where I went to see and feel samples of various evenweaves available for order in 2 yard lengths. The non-traditional color scheme I have in mind is based on using an ivory toned ground fabric. Although I often buy fabric online, in this case I really needed to have visual and tactile confirmation — especially when choosing an off-white shade. Once I had the evenweave in my hands, I knew it was the right way to go.
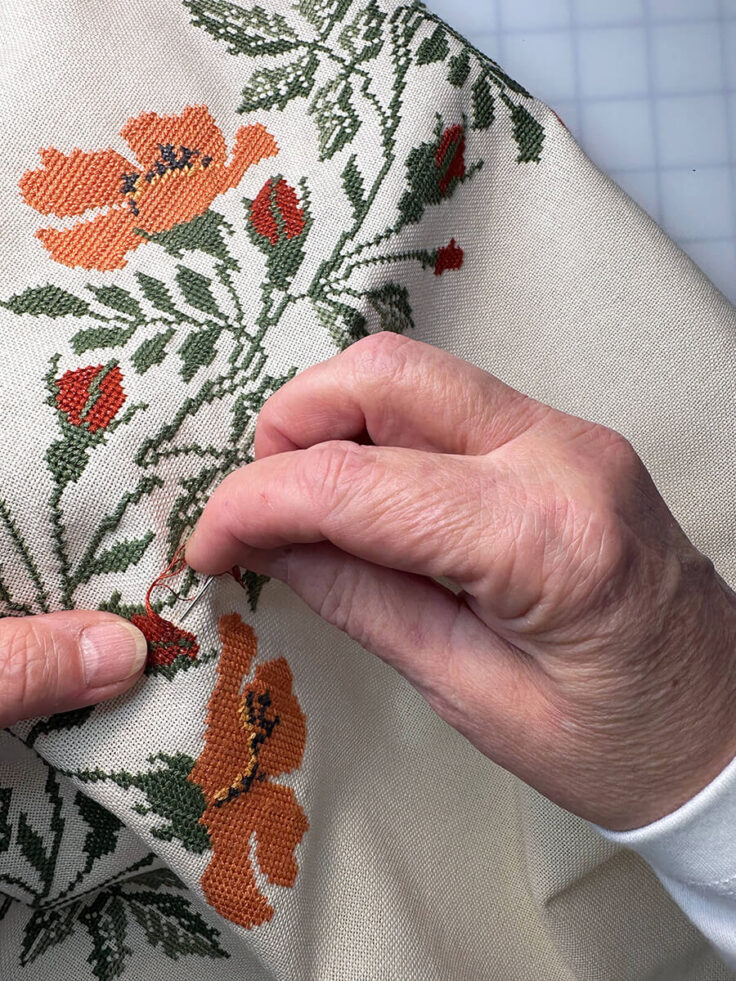
Gloria’s vyshyvanka is being sewn on a premium quality Zweigart Lugana fabric, color name “ivory”. Lugana is a 52% cotton and 48% modal colorfast evenweave that comes in several thread counts. I chose the 28 threads per inch count (similar to 14 count Aida). Lugana has a smooth hand that is comfortable to wear. In addition, the modal fiber in Lugana makes it less prone to wrinkling. The mixed fiber blend makes Lugana softer than a 100% linen, and I was happy to see that it drapes beautifully. Good drape is important for the balloon sleeves, the focal point of a vyshyvanka blouse.
TIP: Evenweave fabrics can be hard to find in large continuous pieces. By the yard or meter, Evenweave is available from online embroidery sources and Etsy sellers.

Vyshyvanka Sewing Pattern
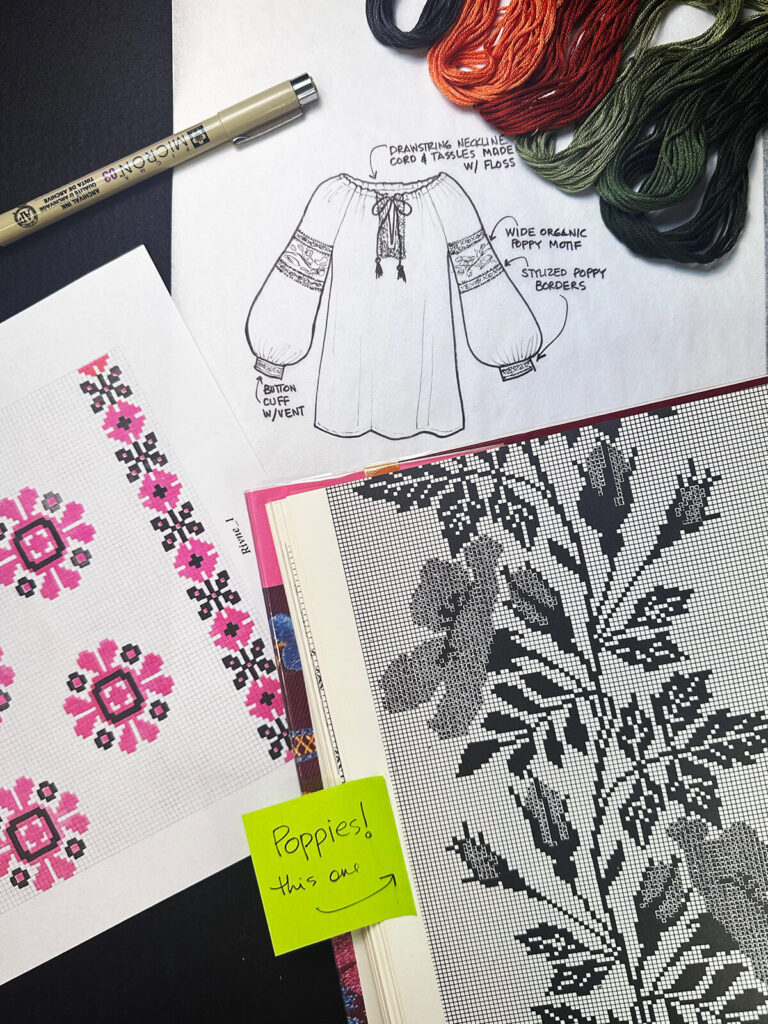
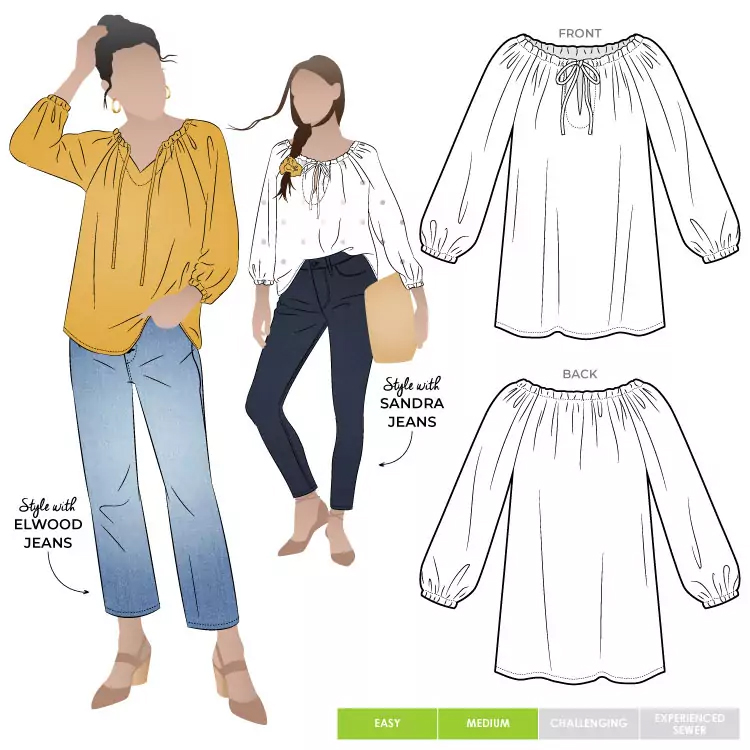
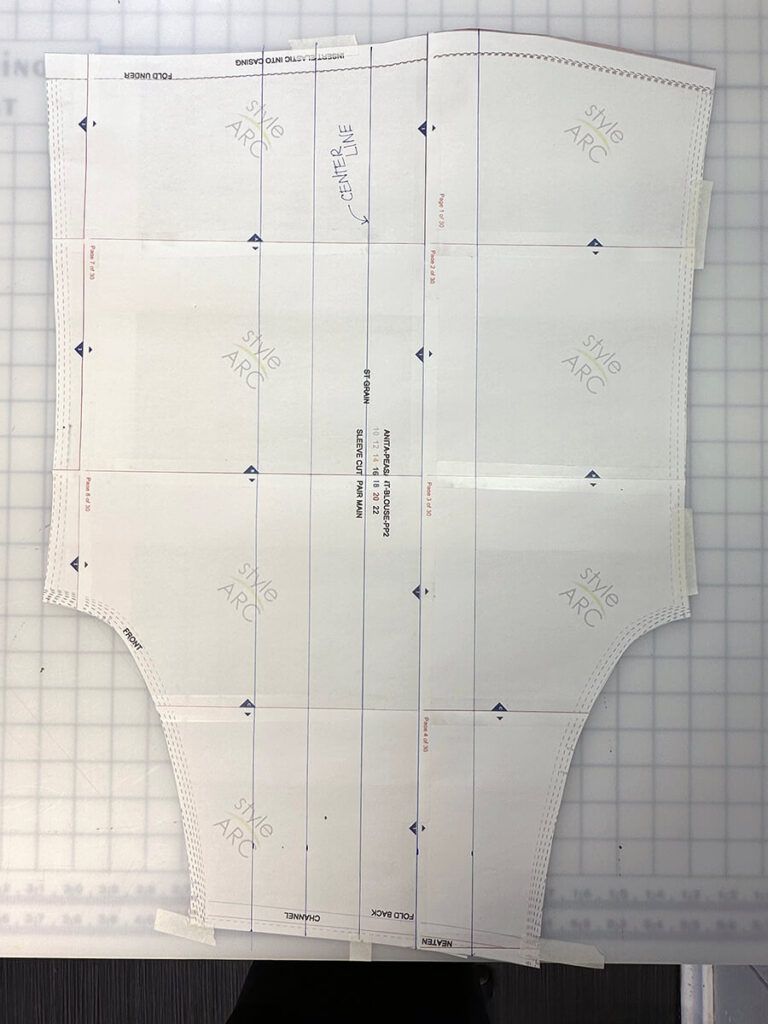
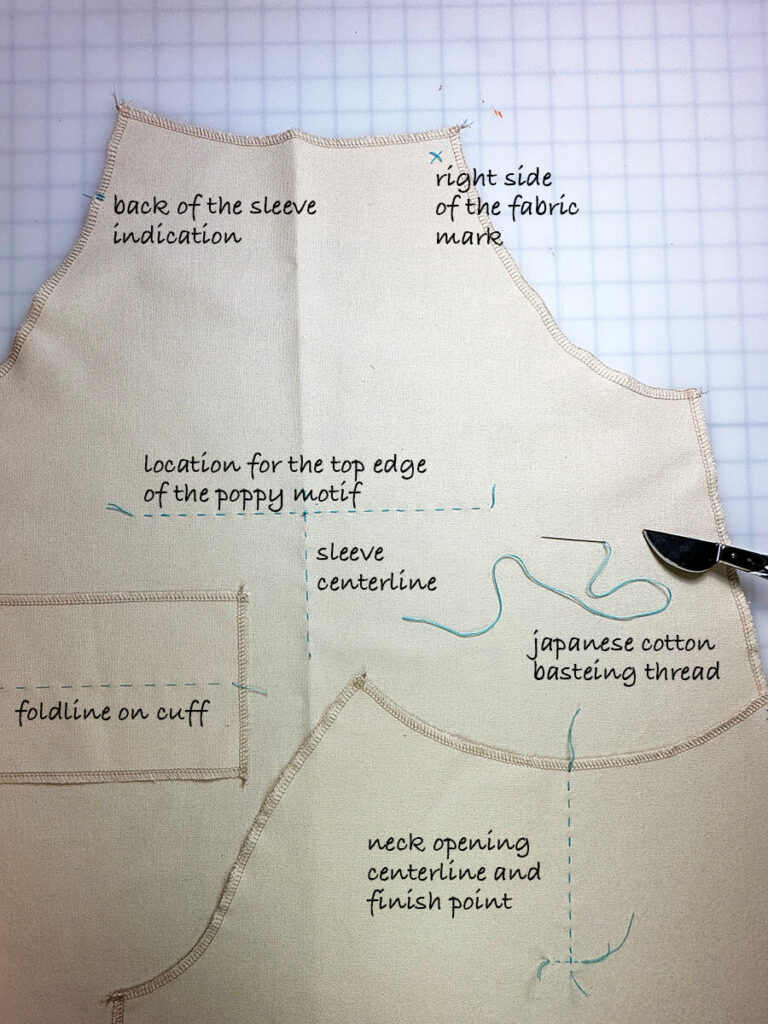
I am using the Anita Blouse pattern from Style Arc as the base sewing pattern for this vyshyvanka blouse. The Anita is has a simple peasant blouse construction with raglan, softly ballooning sleeves and a drawstring neckline. I adjusted the Anita pattern to make it a little more vyshyvanka-like, and also to fit Gloria:
- added 1.5″ banded cuffs with vent and button (instead of elastic in a casing)
- altered the sleeve to add more fullness to the balloon
- added length to both the front and back pattern pieces
- omitted the facing at the neck opening, as I plan to finish the opening with an edging stitch
- instead of a fabric drawstring, I plan to make a cord and tassel drawstring with embroidery floss
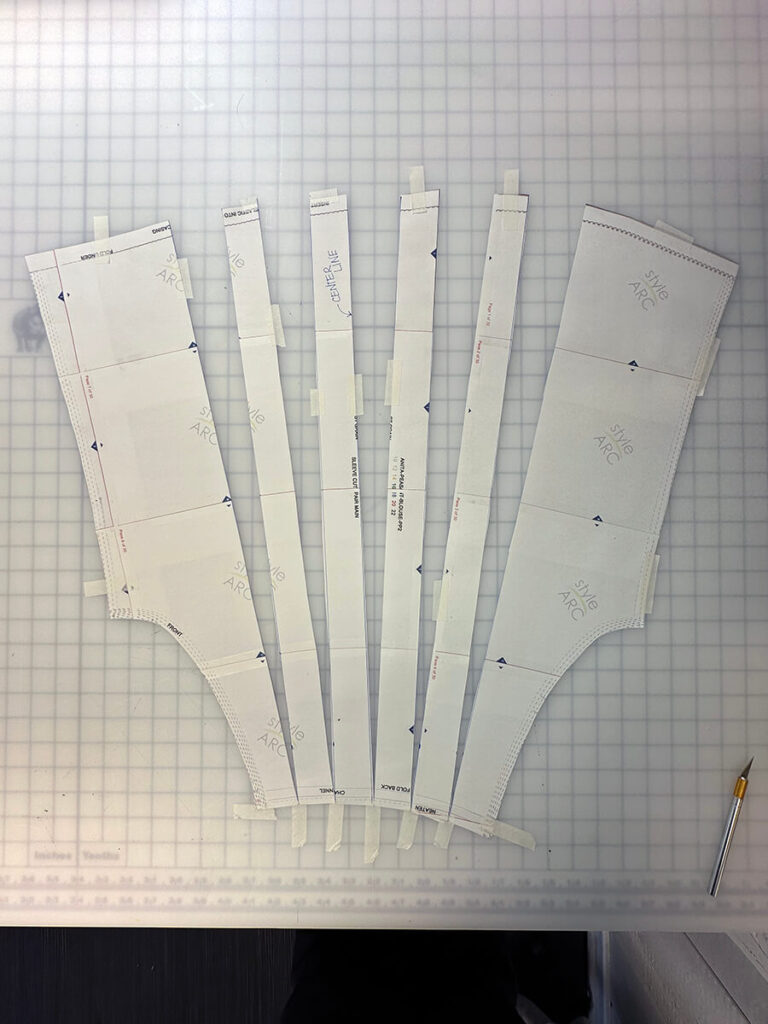
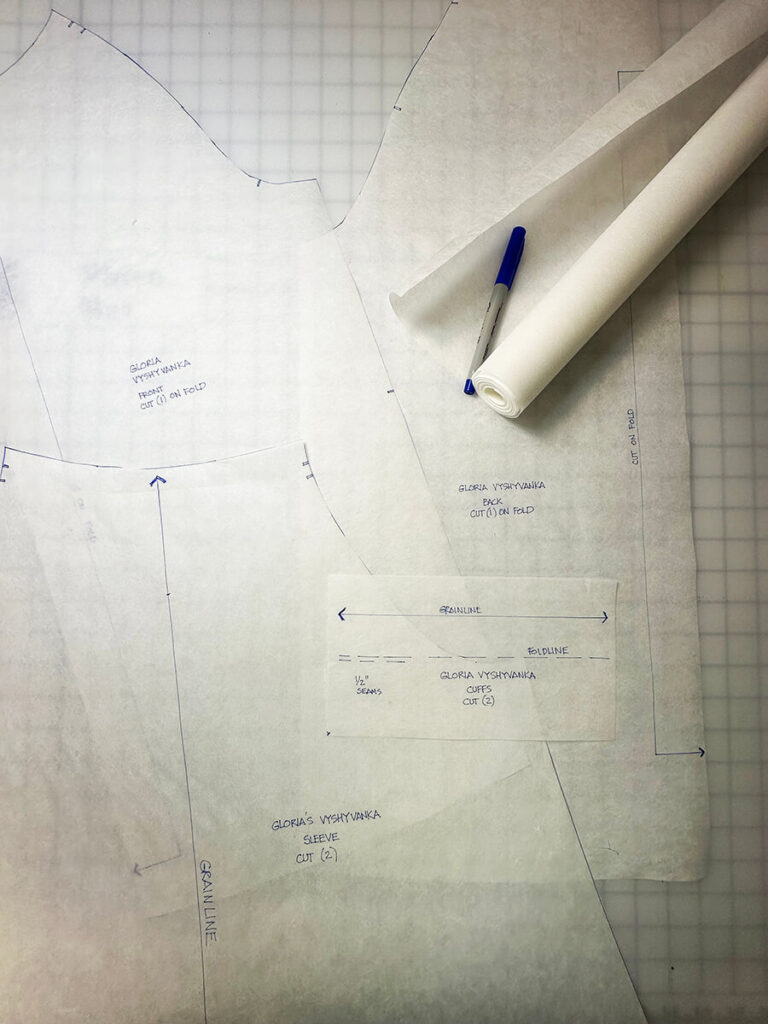
After making the adjustments to the paper pattern, I traced all of the pieces onto sturdy Swedish tracing paper. I hope to get another use out of this pattern when I make a blouse or Gloria’s younger sister, Felicity.
Fabric Prep and Cut
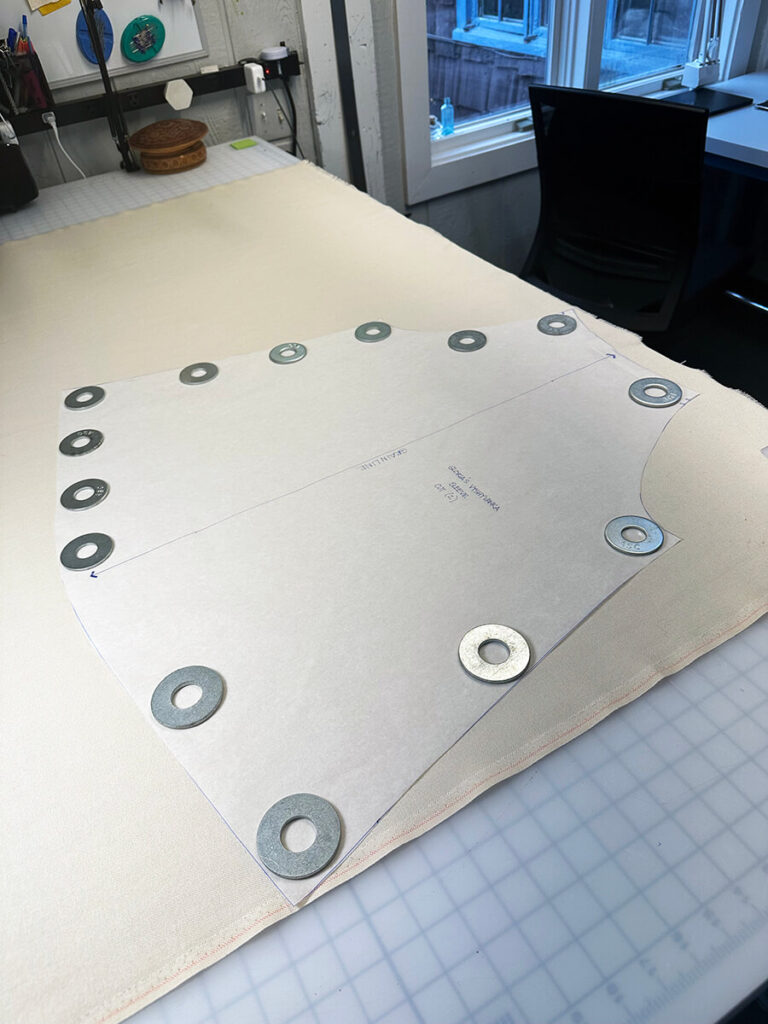
Prewashing – As a rule, I prewash all fabric when making any garment. In this case washing will also remove the sizing and make the evenweave softer to handle when embroidering. Before washing, prep your yardage by sewing or serging the raw cut edges together to minimize raveling in the water. I prewashed the Lugana in cold water using delicate cycle and mild detergent like baby shampoo. Then, the yardage was air tumbled in the dryer. While still a little damp, I give it a good steam press, and rolled the fabric onto a big cardboard tube.
Cutting – Rolling the fabric onto the tube makes it easy to control the yardage and keep it straight on grain. I roll out just enough fabric to accommodate cutting a single pattern piece. To assure keeping the fabric very straight on grain, the pattern pieces are cut in a single layer. Once the tissue pattern pieces are in place and secured with weights, I cut the pieces with a rotary cutter equipped with a fresh, sharp blade.
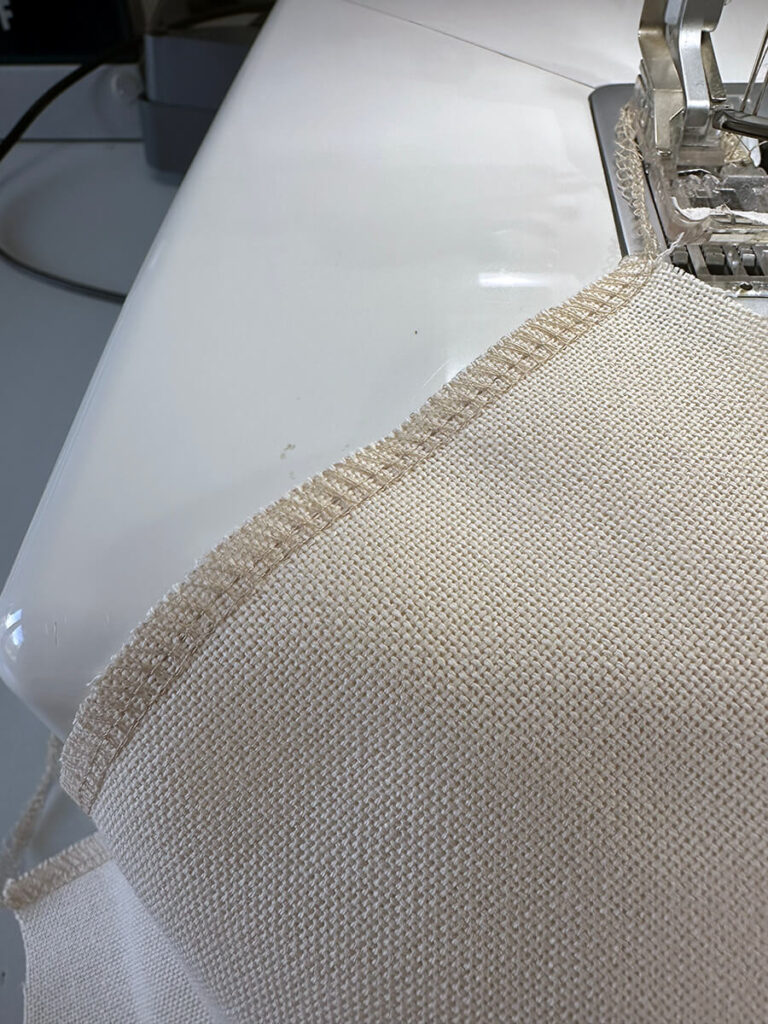
Finishing the raw edges – This step is super important, never skip it, especially when using an evenweave fabric. Since the cut fabric pieces — especially the sleeves — will be enduring a lot of handling during the embroidery process, it is essential for the fabric edges to be finished to prevent raveling. Before I owned a serger, I would hand overcast the edges of each piece — very tedious. Now I just overlock all of the edges. Some people use a product like Fray-Check. I’ve seen some use use paper tape to encase the edges.
Marking – It is important to have a way to make temporary marks on your fabric. For example, the guidelines for embroidery motif position. I use a needle and my Japanese cotton basting thread for these and any required marks. You can also use a disappearing fabric marker, but be sure test this on your fabric to make sure it actually will disappear before using it.
Emboidery Floss Cut and Prep
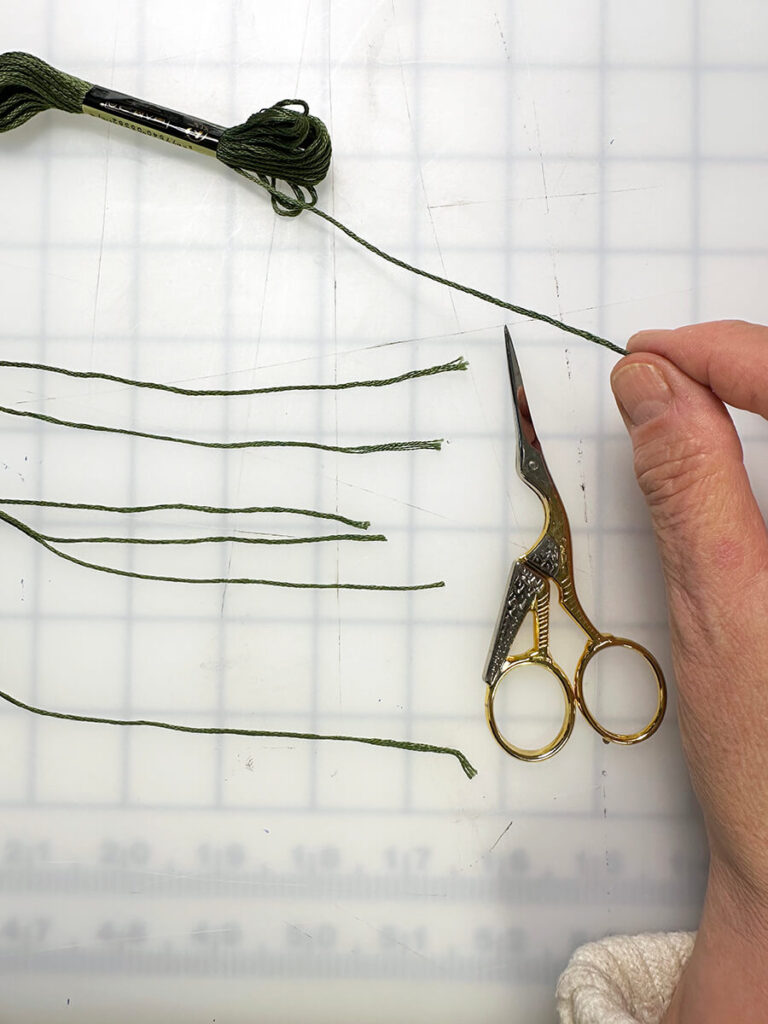
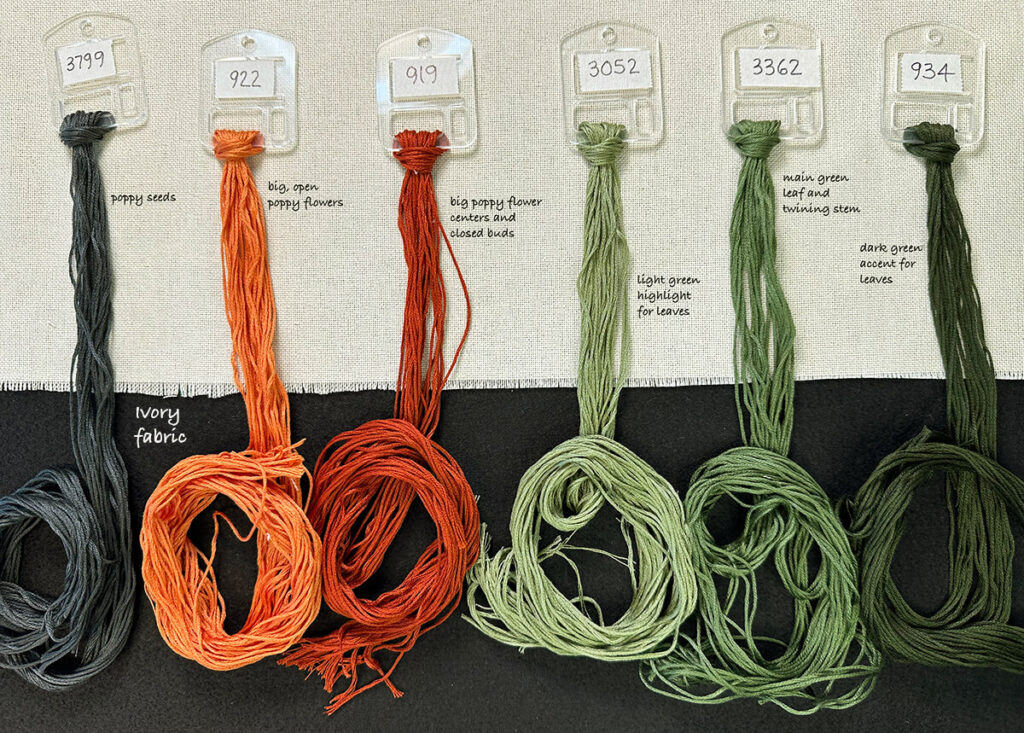
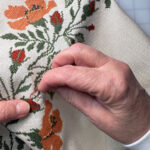
Ukrainian embroidery is traditionally accomplished using stranded cotton embroidery floss. There are several brands to choose from, but I use the six-stranded DMC floss. DMC brand is a high-quality 100% color-fast cotton floss with a wide range of color to choose from. Colorfstness is an important feature when embroidering garments that will be frequently laundered.
Precutting and organizing your floss will help to eliminate dreaded tangles, make it easy and efficient to smoothly draw out individual strands to thread your needle. As you are threading your needle A LOT, it really pays off to take the time up front to make this task as easy and efficient as possible. There are many ways to keep floss tidy. This is my method:
1 – Leaving the paper labels on the skein, find the loose end
2 – Draw out and cut the skein in 6 equal-ish lengths, each approximately 52″ long
3 – Gather the precut strands into a bundle and using a simple cow hitch knot, secure the bundle onto some kind of a holder.
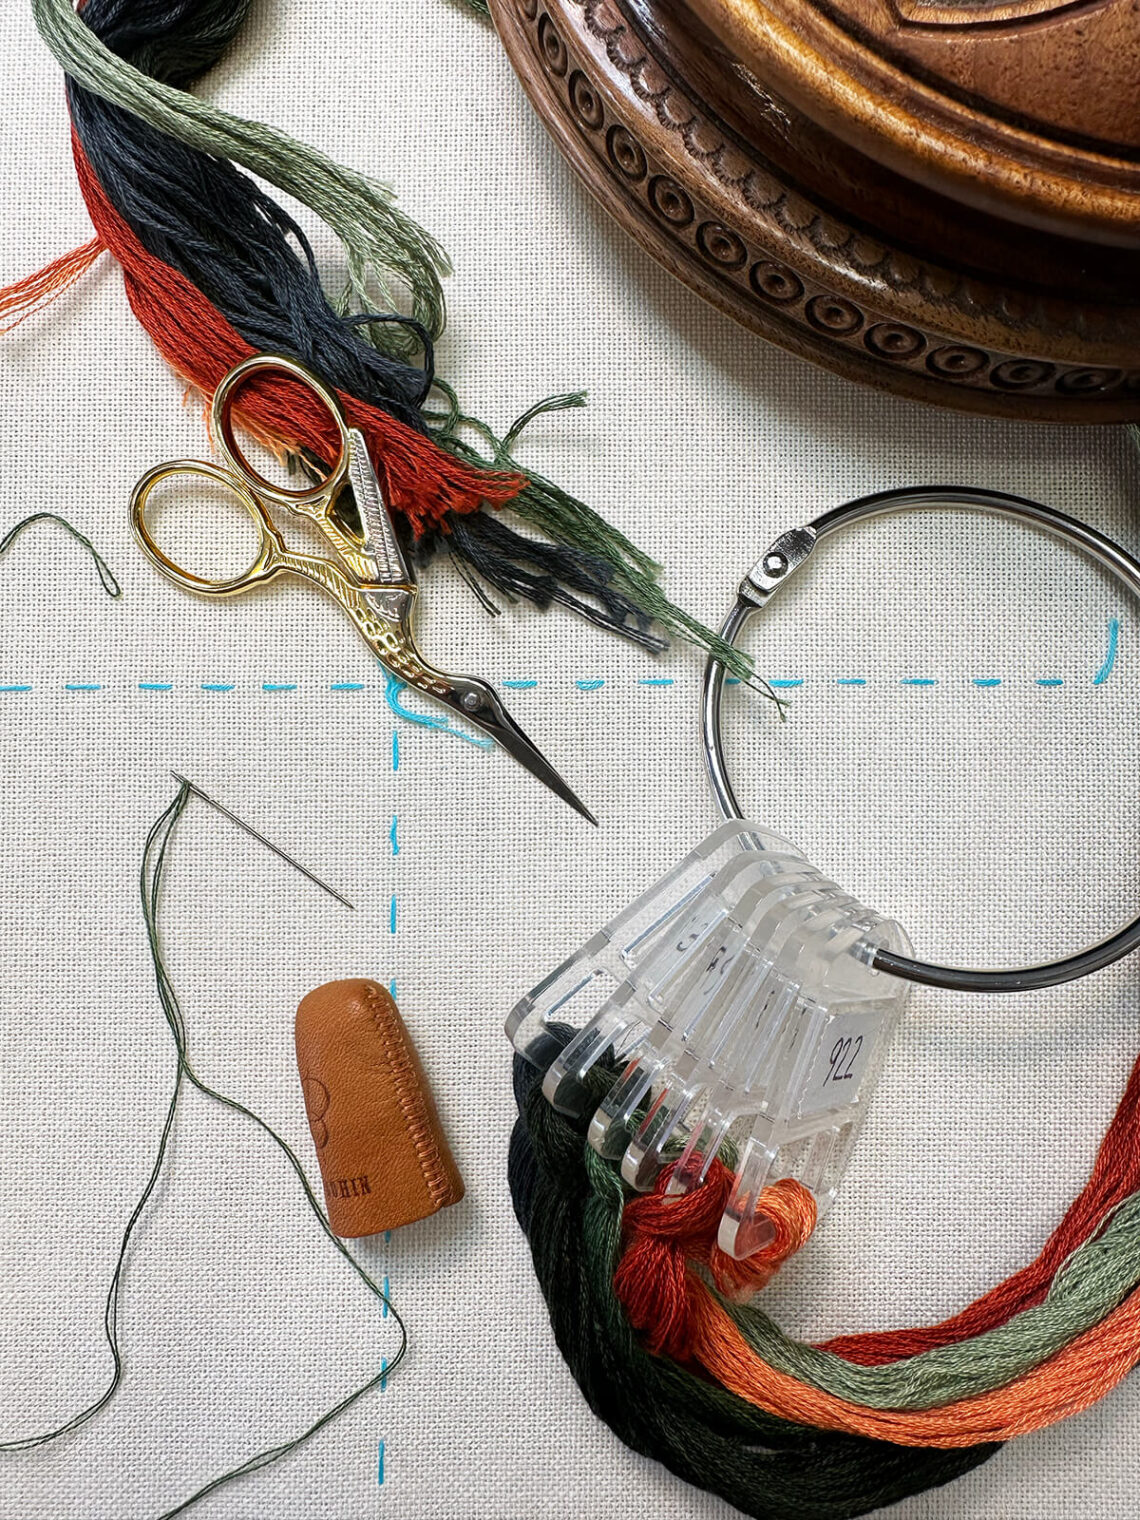
TIP: A square of cardboard with a hole cut into it will do for a floss holder. For this project I found some nifty acrylic floss organizers that I keep on a ring. I note the floss color number onto my organizer as a reference in case I need to buy more.
The Embroidery Tools I Use
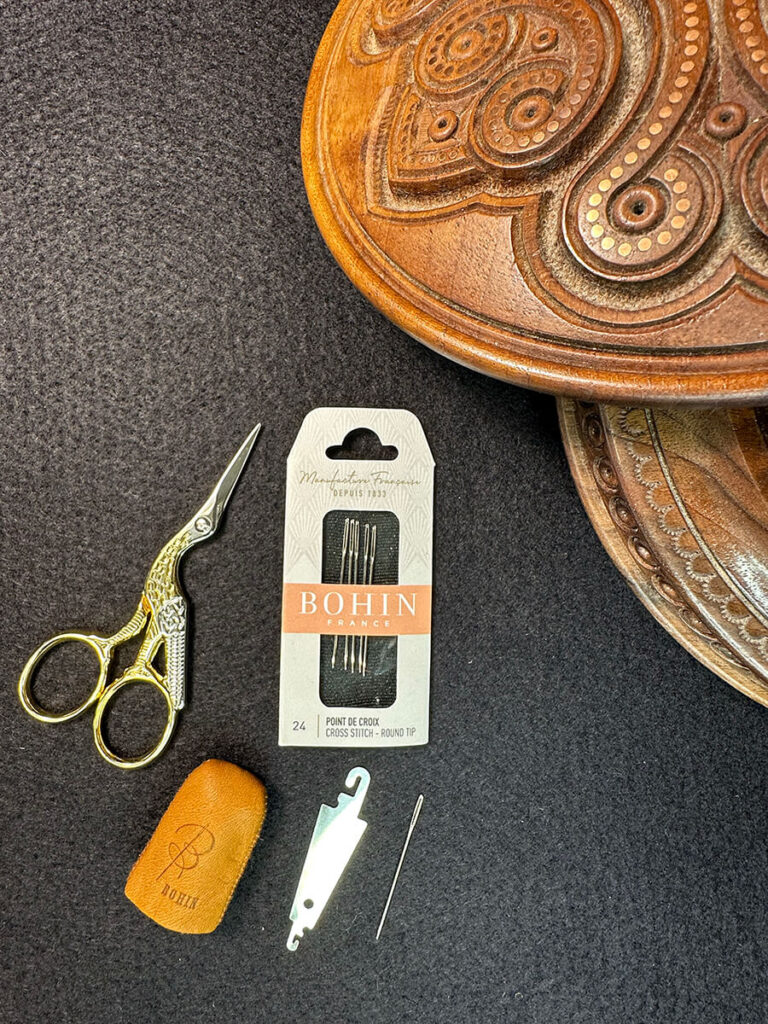
Needles – When I embroider on evenweave, I use a blunt end tapestry needle that can effortlessly move through the weave of the cloth without tearing or breaking the fibers. I find the length of the #24 Tapestry Needle manufactured by Bohin comfortable to use. This Bohin tapestry needle has a nice smooth oval shaped eye that is easy to thread and doesn’t wear out the threaded floss.
Needle threader – The eye of a tapestry needle is large and I usually have no issue with threading my needles. But if you do, a flat metal hooked needle threader does the trick.
Scissors – Any sharp scissors or snips will work for close-clipping thread ends and keeping your embroidery neat. My daughter Grace gave me these little bird embroidery snips, and they are not only sharp, but lovely to look at.
Thimble – I don’t use a thimble on a regular basis, especially when sewing with a tapestry needle. When I do need protection for my finger, I like this soft leather thimble made by Bohim.
Task light – I do most of my embroidery at night sitting on the couch. Since the lighting in our living room isn’t the best for doing any kind of detailed work, I use a rechargeable neck light to help me keep my counted cross stitching accurate.
NOTE: You might notice there is no mention of an embroidery hoop or frame. Traditional Ukrainian embroidery is accomplished frameless, with fabric held loose in the hands.
And We’re Off!
I’m all organized and ready to sew! Now the hard work begins – or as I like to say — the fun part 🙂 Stay tuned for the third installment in this series:
How to Make a Ukrainian Vyshyvanka Blouse — Embroidery Techniques
 How to Make a Vyshyvanka Blouse — Ukrainian Embroidery Techniques
  How to Make a Ukrainian Vyshyvanka Blouse – The Planning
  Make it Special with a Beaded Picot Edge Finish
I am curious, perhaps I didn’t read your description closely enough. I was under the impression, years ago I heard this, that the cuffs, collars, and placket embroidery would be done on sturdy fabric/canvas, and sewn to the shirt so that as the shirt wore out, the embroidered sections could be removed, and reused on a new shirt/blouse.
Is that just something some people do, or something I happened to hear word of mouth, from whoever as “folklore”?
ps: LOVE the background soundtrack on your vimeo clip. Took me a couple of minutes before I remembered who’s song that was. ❤️🙂